Friday, August 9, 2019

Card Dimensions


My friend Toni is always asking me to post the dimensions for different cards. Toni - here it is!

Standard card (opens on the right side):

  • Cut 8 1/2 x 11" cardstock at 5 1/2" 
  • Score at 4 1/4"
  • The first layer on top of this card would be cut a 5 1/4" x 4"

Vertical opening card (opens from the bottom up): 

  • Cut 8 1/2 x 11" cardstock at 4 1/4" 
  • Score at 5 1/2"
  • The first layer on top of this card would be cut a 5 1/4" x 4"
Gatefold card: 

  • Cut 8 1/2 x 11" cardstock at 5 1/2"
  • Score at 2 1/8" and 6 3/8"
  • DSP for each panel: 5 1/4" x 1 7/8"
Triangle Front card: 

  • Cut 8 1/2 x 11" cardstock diagonally from one corner to the opposite corner.
  • Score at 4 1/4" and 5 1/2"
  • Cut DSP 5 1/4" x 4" then also cut this on the diagonal, making sure your pattern is going to go in the direction you prefer.
Easel Card:

  • Cut 8 1/2 x 11" cardstock at 4 1/4" 
  • Score at 5 1/2" and 2 3/4"
  • Another piece of cardstock to make the layer attached to the top portion of this card, forming the easel, cut 4 1/4" x 5 1/2" 
  • Glue this piece to the smaller portion of the original cardstock
  • The inside of this card 5 1/4" x 4"
Accordion Card: (I use this when I need a thank you card for a speaker and needs lots of room for signatures).

  • Cut 12x12 cardstock to 5 1/2" x 11 1/2".
  • Score at 4 1/4", 5", 5 3/4", 6 1/2", 7 1/4"
  • Fold on the score lines
  • Cut inside pieces 5" x 3 3/4"
  • Put tear & tape adhesive on 1 edge of each of the 5" x 3 3/4"(on both sides of that edge)
  • Insert into the scored folds and press closed
  • Glue together the outside folds
Graduation Hat:

  • Cut Basic Black 8 1/2 x 11" cardstock to 4 1/4" x 9 3/4?
  • Score at 5 1/2" and fold
  • Mark with a scoring tool at 2 1/8" after putting folded edge into the trimmer
  • Open the card, put the shorter end in and mark at 2 1/8"
  • Score diagonally across the center
  • Cut off the corners (measure 2")
  • Fold in the edges
  • Inside the hat


Sunday, August 4, 2019

Back On Your Feet Half Circle Pop Up Card

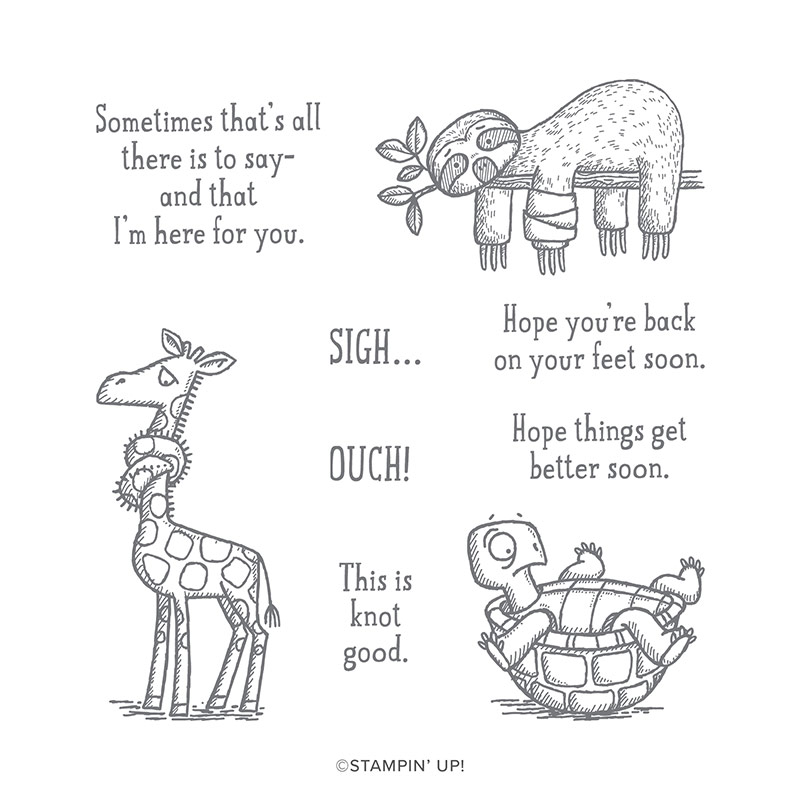
I LOVE this Back On Your Feet stamp set! It's super cute and so fun to color.  You know you're going to make someone smile when they open the envelope and see the sloth hanging out on his tree branch.  Or the poor giraffe all tied up in knots.  Who could resist the topsy turvy turtle!  Stampin' Up had a tutorial for this particular type of card and it's one of my favorites to make.  My mother and I had fun making these together over Skype today!


See below for supplies and sizes for card pieces.

Directions:
  • Score the Whisper White cardstock at 1", 2 3/4" and 4 1/2"
  • Center the 2 1/4" Circle Punch in the center score line and punch
  • Fold on the score lines so the punched halves are the "mountain"
  • Use glue dots to attach a piece of Window Sheet inside the fold
  • Use glue dots to attached two punched images (circles here) on either side of the window sheet
  • Adhere the Whisper White cardstock to the inside of the card first. Be careful to line it up straight and be mindful of the fold.  Adhere the edges on either side of the fold.
  • The 3-3/8" x 5" piece of DSP will cover 1" of the Whisper White cardstock.  Line up the DSP edges to the top and sides of the card that's not covered by the large piece of Whisper White.

Don't forget to buy envelopes for your beautiful card!

Supplies Used:


149385            Price: $21.00


115316            Price: $8.75

Size: 4 ¼ ”x11”


149443            Price: $11.50

Sizes: 3 ½” x 4 ¼” (front)

½” x 4 ¼” (front strip)

3 3/8” x 5” (inside top)


100730            Price: $9.75

Size: 3 3/8” x 9 ½”; scrap for the sloth and for punching circles

Score at 1” and 2 ¾” and 4 ½”


Stampin’ Blends Markers Combo Packs


144601            Price: $9.00


144602            Price: $9.00


144597            Price: $9.00


Stampin’ Blends Markers Individual


144581            Price: $4.50


144608            Price: $4.50


143720            Price: $18.00

Center the 2 ¼” Circle Punch in the center score line/punch.


138299            Price: $16.00

Punch 2 circles from Whisper White


147098
Price: $7.50

132708
Price: $6.00


Window Sheets                       

142314                        

Price: $5.00                

Cut ½” x 3 ¼”


144108
Price: $4.00


Multipurpose Liquid        

Glue                                        

110755                                    

Price: $4.00

103683
Price: $5.25


Bone Folder                           

102300                                    

Price: $7.00                             

122334
Price: $30.00


Stampin’ Scrub           

126200                        

Price: $18.00               

102394
Price: $5.00

Sunday, July 21, 2019

Perennial Flower Punch Triangle Card


Here's another great fun fold card!  This is the card I made on last week's Facebook Live.  I showed my daughter both sides of the Mosaic Mood DSP and she agreed that this side was not only beautiful but shiny too!  I hope you have as much fun making this as I did!  
I punched 3 flowers with the Perennial Flower Punch out of the Petal Pink cardstock.  In the center of the flower I placed the largest of the In Color Faceted Dots.  All of this was glued together and centered in a circle of Whisper White cardstock that I cut out using the  Layering Circles dies.  The Whisper White cardstock is mounted on another circle cut out of  Terracotta Tile Cardstock.  The card is also made with Terracotta Tile cardstock and I used my trimmer to cut it at a diagonal.  Then used the Paper Snips to cut it the rest of the way.  The Simply Scored board made it easy to make my score lines.  One of my favorite tools!!  The bone folder was used to make crisp folds.  I cut a piece of  Mosaic Mood Specialty DesignerSeries Paper 4 x 5 ¼” then cut it in diagonal as well.  Another piece of Whisper White cut 4 x 5 ¼” went inside the card.  Both of these were glued on with the Multipurpose Liquid Glue - which as I said previously is my favorite adhesive.  Don't forget to watch my video on Facebook to see exactly what I did!  Comment if you have any questions. Have a wonderful day!

"God is our refuge and strength,
    an ever-present help in trouble."

Psalm 46:1

Monday, July 15, 2019

Double Easel Fun Fold Card!


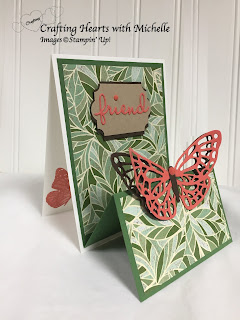
I love making cards with fun folds!  You can watch the video in the link to the left to see how I made this double easel fun fold card using Whisper White cardstock, Garden Green cardstock, Mosaic Mood DSP, and the Springtime Impressions Dies.  The  butterflies were stamped with the Butterfly Wishes Cling Stamp Set inside the card with Terracotta Tile ink.


Card Dimensions:
Card Base: Whisper White 4 1/4 x 11" - score at 5 1/2"
Inside card: Whisper White 4 x 5 1/4"
Double fold (Garden Green): 4 x 10 1/4" - score at 5" and 2 1/2"
DSP: 3 3/4 x 5" and 2 1/4 x 3 3/4"

Using the Springtime Impressions Dies I cut out two of the butterflies.  The first from Terracotta Tile and the other from Early Espresso.  I cut up the Early Espresso butterfly and glued the body to the front of the Terracotta Tile butterfly, curved the wings with the bone folder, then glued the Early Espresso wings to the back of the Terracotta Tile butterfly to give it depth. I placed a large Terracotta Tile Faceted Dot on the head of the butterfly.

With the Everyday Label punch I punched out 2 shapes.  One with Crumb Cake, the other with Early Espresso.  I used the paper snips to cut the Early Espresso in half and glued it to the back of the Crumb Cake piece to border it.  Using the Well Written Dies I cut out "friend" and glued it to the piece of Crumb Cake.

Everything is glued together with my favorite adhesive - Multipurpose Liquid Glue!!

Monday, July 8, 2019

Sailing Home Sampler...


I was on vacation last week and didn't post anything!  But my husband and I came back and tackled o
our half bath.  I painted and he put in beadboard and chair rail - he's the best!  Then I spent the weekend making samplers to hang on the walls.  It was a lot of fun and took a lot of thinking to come up with so many different squares and rectangles!  I recycled picture frames that were hanging in the room already - repainted them white.


I used the Sailing Home Bundle  and the Come Sail Away Designer Series Paper from Stampin' Up!  I just love the Night of Navy paper. I think it's the paper I use the most!  Other than Whisper White, which is also a staple in my crafting.  Mossy Meadow ink and paper worked wonderfully for the seaweed.  I used the stamps from the June Paper Pumpkin for the sand dollars and the starfish. To brighten things up I used Balmy Blue paper, Terracotta Tile ink and Merry Merlot inkCrumb Cake and Early Expresso papers worked beautifully for the die cut rope and the ship's wheel.

I cut out scriptures using different dies: Sticthed Seasons Framelits dies which is currently on clearance, Layering Circles Dies and Stitched Shapes Dies.  I used the large letters dies, but they are retired.  Stampin' Up has great alternatives to them! The Hand-Lettered Pros Dies and the Layering Alphabet Dies.  If you love these like I do you can order with the host code on the left side of the page.

The base size for the rectangles - 6 1/4x3" and the squares - 3x3".  I love making samplers!  I've made 3 for baby gifts in the past and another one to have on hand if I need a quick gift.

Tuesday, June 25, 2019

Welcome

Welcome to Crafting Hearts with Michelle! I'm not a writer or a blogger.  In fact, I don't usually read blogs myself.  However I do love to make cards and teach others how to make them.  My goal is to share my love for card making with you.  Hearing from someone you've sent a card to for birthdays, when they are sick or just when they need an encouraging note brings great joy.  Our church sends out a prayer list and what better way to let someone know you are thinking and praying for them than to send a handmade card.

I also love to make and give gifts to friends and family.  I feel making someone a set of cards or a sampler shows that you care and took the time to make them something.  Now, I know, not everyone can do this.    There are lots of things I'm not able to do - knit or do anything with technology for example.  My daughter helped me create this blog!

I've been using Stampin' Up! products for 20 years.  Recently I decided to become a demonstrator and share my love of their products with others.  I've been teaching card classes and on Facebook Live teaching how to make different projects.  I will do my best to post weekly the projects I am working on - most likely Monday or Tuesday.  I do a Facebook Live each Tuesday at 4 PM and teach a card class once a month in Oakton, Virginia.  If you are in my area I'd love to meet you and make cards together!  If not, I'd love to hear from you on my blog or Facebook page (the link is on the right).

Thank you for joining me on this journey!

Here's one of the cards I've made recently!
The Butterfly Beauty Dies are so fun to work with! I love how Stampin' Up! paper coordinates so well.  I used Mint Macaron for the card base.  The top layer of the butterflies and the border are from Pacific Point paper and the underlayer of butterflies - Balmy Blue. The basic rhinestones add a little bling to the card!